如何使用Maven搭建是SpringMVC+Spring+Mybatis完整的Java项目
前言
网上发布了不少关于搭建 Spring+SpringMVC+Mybatis 的技术文章,但是基本都是缺斤少两。我利用闲余时间自己搭建了一个完整的项目,希望对各位coder有所帮助,此项目仅供参考,自己搭建一遍才会有所收获。搭建过程中出现什么问题可以提出来大家一起解决
项目源码
流程:搭建maven项目 > 搭建SpriingMVC > 搭建Spring > 搭建Mybatis > 新建各种类(controller/service…)
PS:不想看文章,可以忽略文章内容直接去看代码源码
【JDK1.8.0_201百度云盘链接 提取码:ow66 】
【Apache-maven-3.6.0百度云盘链接 提取码:jcu1 】
【Apache-tomcat-8.5.24百度云盘链接 提取码:sm45 】
【Github 项目源码链接】
开发环境
- 开发工具:
Eclipse - 框架选型:
SpringMVC、Spring、Mybatis - 数据库:
MySQL - Jar包依赖方式:
apache-maven-3.6.0 - JDK版本:
jdk1.8.0_201 - Tomcat容器:
apache-tomcat-8.5.24
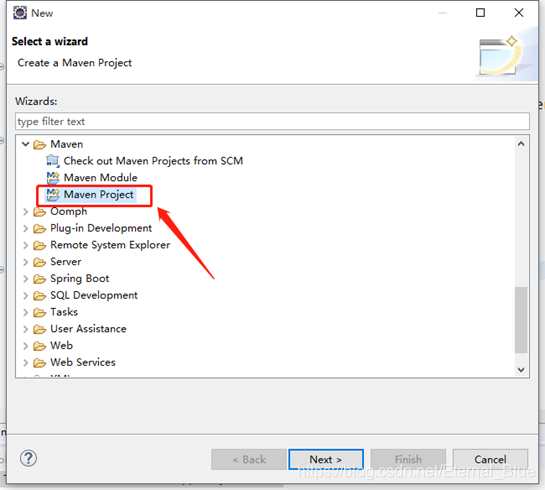
创建Maven项目


新建成功的项目结构:
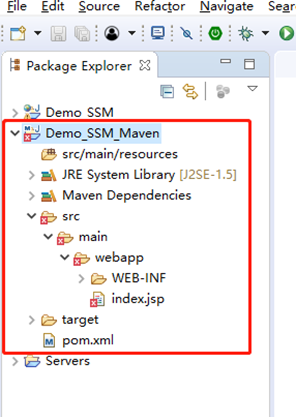
新建项目只有一个 src/main/resources,
并且项目会出现错误,而且项目报下面的 The superclass "javax.servlet.http.HttpServlet" was not found on the Java Build Patht 错误

解决方案:右击项目 > 点击Properties > 点击Java Build Path >选择Library > 点击Add Library > 选择Server Runtime > Apache Tomcat7 服务器(Tomcat8 需要 web版本3.0)
PS:注意:Eclipse中需要先配置好Tomcat【Windows > Preferences > Server > Runtime Environments】


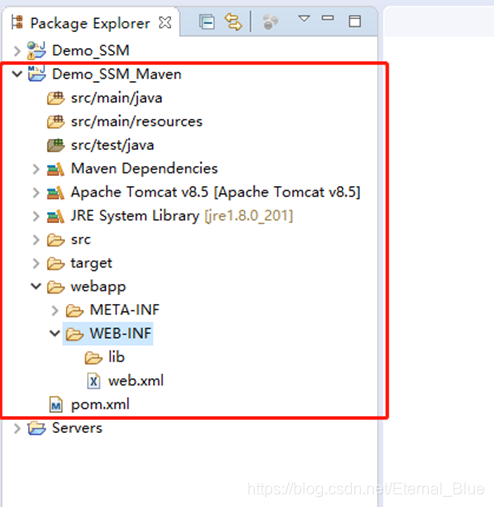
点击Apply,干掉项目错误后,项目结构发生了改变,自动生成了src/main/java和src/test/java目录

此时,新建项目的jre版本是1.5,web.xml版本为2.3。我们需要对版本进行修改
修改pom.xml中的配置

代码如下:
1 | <build> |
修改完配置,会出现下面这个问题

解决方法:只需要更新maven。右击项目> 点击Maven >点击Update Project..


把jre 指定到Workspace default JRE

修改web.xml版本
默认的Dynamic Web Module为2.3,使用Tomcat 8.5,需要修改为3.0
- 方法一:修改maven工程所在目录下org.eclipse.wst.common.project.facet.core.xml
1
2
3
4
5
6
7
8
<faceted-project>
<fixed facet="wst.jsdt.web"/>
<installed facet="java" version="1.8"/>
<!—2.3修改为3.0 -->
<installed facet="jst.web" version="2.3"/>
<installed facet="wst.jsdt.web" version="1.0"/>
</faceted-project> - 方法二:右击项目 > 点击
Properties> 点击Project Facets(项目模板)如下图,可以看到
Dynamic Web Module版本为2.3
直接修改3.0会出现错误不允许修改

解决方法:先取消Dynamic Web Module前面的勾选,再选择3.0,然后Apple and Close

重新打开这个页面,对Dynamic Web Module进行勾选。
这时候先不要着急保存关闭。点击下面的Furter configuration avail…
修改Content directory为webapp,并勾选下面,如果保存保存保存

最后的项目结构是这样的
此时项目中的web.xml是下图这样的
1
2
3
4
5
6
7
8
9
10
11
12
<web-app xmlns:xsi="http://www.w3.org/2001/XMLSchema-instance" xmlns="http://java.sun.com/xml/ns/javaee" xsi:schemaLocation="http://java.sun.com/xml/ns/javaee http://java.sun.com/xml/ns/javaee/web-app_3_0.xsd" id="WebApp_ID" version="3.0">
<display-name>Demo_SSM_Maven</display-name>
<welcome-file-list>
<welcome-file>index.html</welcome-file>
<welcome-file>index.htm</welcome-file>
<welcome-file>index.jsp</welcome-file>
<welcome-file>default.html</welcome-file>
<welcome-file>default.htm</welcome-file>
<welcome-file>default.jsp</welcome-file>
</welcome-file-list>
</web-app>
搭建SpringMVC
Maven项目搭建好了以后,就开始搭建SpringMVC框架
- pom.xml文件中添加springmvc依赖
1
2
3
4
5
6<!-- springMVC -->
<dependency>
<groupId>org.springframework</groupId>
<artifactId>spring-webmvc</artifactId>
<version>4.3.14.RELEASE</version>
</dependency> - 创建springmvc配置文件
在src/main/resource下创建spring-mvc.xml,内容如下,配置好
1
2
3
4
5
6
7
8
9
10
11
12
13
14
15
16
17
18
19
20<?xml version="1.0" encoding="UTF-8"?>
<beans xmlns="http://www.springframework.org/schema/beans"
xmlns:xsi="http://www.w3.org/2001/XMLSchema-instance" xmlns:p="http://www.springframework.org/schema/p"
xmlns:mvc="http://www.springframework.org/schema/mvc" xmlns:context="http://www.springframework.org/schema/context"
xmlns:util="http://www.springframework.org/schema/util"
xsi:schemaLocation="http://www.springframework.org/schema/beans http://www.springframework.org/schema/beans/spring-beans-3.0.xsd
http://www.springframework.org/schema/context http://www.springframework.org/schema/context/spring-context-3.0.xsd
http://www.springframework.org/schema/mvc http://www.springframework.org/schema/mvc/spring-mvc-3.0.xsd
http://www.springframework.org/schema/util http://www.springframework.org/schema/util/spring-util-3.0.xsd">
<!-- 开启注解 -->
<mvc:annotation-driven />
<!-- 让扫描spring扫描这个包下所有的类,让标注spring注解的类生效 -->
<context:component-scan base-package="com.ryx.demo.controller"></context:component-scan>
<!-- 视图解析器 -->
<bean class="org.springframework.web.servlet.view.InternalResourceViewResolver">
<property name="prefix" value="/views/" />
<property name="suffix" value=".jsp"></property>
</bean>
</beans> - 在web.xml中添加配置
1
2
3
4
5
6
7
8
9
10
11
12
13
14
15
16<!-- 定义前端控制器springmvc -->
<servlet>
<servlet-name>spring-mvc</servlet-name>
<servlet-class>org.springframework.web.servlet.DispatcherServlet</servlet-class>
<!-- 指定路径 -->
<init-param>
<param-name>contextConfigLocation</param-name>
<param-value>classpath:spring-mvc.xml</param-value>
</init-param>
<!-- 随spring启动而启动 -->
<load-on-startup>1</load-on-startup>
</servlet>
<servlet-mapping>
<servlet-name>spring-mvc</servlet-name>
<url-pattern>/</url-pattern>
</servlet-mapping> - 创建一个controller测试SpringMVC框架
可以使用PostMan接口测试工具进行测试
http://127.0.0.1:8080/Demo_SSM_Maven/demo/test1
2
3
4
5
6
7
8
9
10
11
12
13
14import org.springframework.stereotype.Controller;
import org.springframework.web.bind.annotation.RequestMapping;
import org.springframework.web.bind.annotation.ResponseBody;
public class studentController {
public String test() {
return "hello,word";
}
}
搭建Spring
SpringMVC框架搭建成功后,就开始搭建Spring框架
PS:由于在依赖springmvc的时候已经添加了许多spring相关包了,所以此时不需要添加额外的包,可以直接创建配置文件了。
创建spring-context.xml配置文件
在
src/main/resource下创建spring-context.xml,内容如下1
2
3
4
5
6
7
8
9
10
11
12
13
14
15
16
<beans xmlns="http://www.springframework.org/schema/beans"
xmlns:xsi="http://www.w3.org/2001/XMLSchema-instance"
xmlns:p="http://www.springframework.org/schema/p"
xmlns:mvc="http://www.springframework.org/schema/mvc"
xmlns:context="http://www.springframework.org/schema/context"
xmlns:util="http://www.springframework.org/schema/util"
xmlns:aop="http://www.springframework.org/schema/aop"
xmlns:tx="http://www.springframework.org/schema/tx"
xsi:schemaLocation="http://www.springframework.org/schema/beans http://www.springframework.org/schema/beans/spring-beans-3.0.xsd
http://www.springframework.org/schema/context http://www.springframework.org/schema/context/spring-context-3.0.xsd
http://www.springframework.org/schema/mvc http://www.springframework.org/schema/mvc/spring-mvc-3.0.xsd
http://www.springframework.org/schema/util http://www.springframework.org/schema/util/spring-util-3.0.xsd
http://www.springframework.org/schema/tx http://www.springframework.org/schema/tx/spring-tx.xsd
http://www.springframework.org/schema/aop http://www.springframework.org/schema/aop/spring-aop.xsd">
</beans>温馨提示:如果xml文件头文件报错 ,并显示一下错误

解决方式:
window>Prefereces>XML>XML Files>Validation> 取消掉Honour all XML schema locations前面的对勾
web.xml中配置spring
1
2
3
4
5
6
7
8
9<!-- 配置适配器spring -->
<listener>
<description>启动spring容器</description>
<listener-class>org.springframework.web.context.ContextLoaderListener</listener-class>
</listener>
<context-param>
<param-name>contextConfigLocation</param-name>
<param-value>classpath:spring-context.xml</param-value>
</context-param>- pom.xml中配置 数据源+数据库 的依赖jar包(我用的数据源是C3P0)
1
2
3
4
5
6
7
8
9
10
11
12
13
14<!-- 数据库连接 //start -->
<!-- c3p0 数据库连接池 -->
<dependency>
<groupId>com.mchange</groupId>
<artifactId>c3p0</artifactId>
<version>0.9.5.2</version>
</dependency>
<!-- 数据库 -->
<dependency>
<groupId>mysql</groupId>
<artifactId>mysql-connector-java</artifactId>
<version>6.0.6</version>
</dependency>
<!-- 数据库连接 //end --> - 在spring-context.xml配置c3p0数据源
1
2
3
4
5
6
7
8
9
10
11
12<!-- 配置c3p0 -->
<!-- 连接池 -->
<bean id="dataSource" class="com.mchange.v2.c3p0.ComboPooledDataSource">
<property name="driverClass" value="com.mysql.jdbc.Driver"></property>
<property name="jdbcUrl" value="jdbc:mysql://localhost/demo?characterEncoding=utf8&serverTimezone=UTC"></property>
<property name="user" value="root"></property>
<property name="password" value="123456"></property>
<property name="minPoolSize" value="1"></property>
<property name="maxPoolSize" value="5"></property>
<property name="initialPoolSize" value="1"></property>
<property name="acquireIncrement" value="1"></property>
</bean> - 配置spring声明式事务管理,pom.xml中添加 声明式事务的依赖jar包
1
2
3
4
5
6
7
8
9
10
11
12
13
14<!-- spring声明式事务管理 //start -->
<!-- spring-tx -->
<dependency>
<groupId>org.springframework</groupId>
<artifactId>spring-tx</artifactId>
<version>4.3.14.RELEASE</version>
</dependency>
<!-- spring-jdbc -->
<dependency>
<groupId>org.springframework</groupId>
<artifactId>spring-jdbc</artifactId>
<version>4.3.14.RELEASE</version>
</dependency>
<!-- spring声明式事务管理 //end --> - 在spring-context.xml配置事务管理器
1
2
3
4
5
6
7<!-- 配置spring声明式事务管理 -->
<!-- 配置事务管理器 -->
<bean id="transactionManager" class="org.springframework.jdbc.datasource.DataSourceTransactionManager">
<property name="dataSource" ref="dataSource"></property>
</bean>
<!-- 使用注解来控制事务 -->
<tx:annotation-driven transaction-manager="transactionManager"></tx:annotation-driven>
搭建Mybatis
配置好SpringMVC、Spring后,开始搭建Mybatis
- pom.xml中添加Mybatis的依赖jar包
1
2
3
4
5
6
7
8
9
10
11
12
13
14
15
16
17
18
19
20
21<!-- Mybatis //start -->
<!-- mybatis -->
<dependency>
<groupId>org.mybatis</groupId>
<artifactId>mybatis</artifactId>
<version>3.4.1</version>
</dependency>
<!-- mybatis-spring//无缝整合mybatis+spring -->
<dependency>
<groupId>org.mybatis</groupId>
<artifactId>mybatis-spring</artifactId>
<version>1.3.0</version>
</dependency>
<!-- cglib代理 -->
<dependency>
<groupId>cglib</groupId>
<artifactId>cglib</artifactId>
<version>3.2.2</version>
</dependency>
<!-- Mybatis //end --> - 创建mybatis-config.xml配置文件
在
src/main/resource下创建mybatis-config.xml,内容如下1
2
3
4
5
6
7
8
9
10
11
12
13
14
15
16
17
18<?xml version="1.0" encoding="UTF-8"?>
<!DOCTYPE configuration PUBLIC "-//mybatis.org//DTD Config 3.0//EN" "http://mybatis.org/dtd/mybatis-3-config.dtd">
<configuration>
<settings>
<!-- 全局地开启或关闭配置文件中的所有映射器已经配置的任何缓存 -->
<setting name="cacheEnabled" value="true" />
<!-- 设置超时时间,它决定驱动等待数据库响应的秒数 -->
<setting name="defaultStatementTimeout" value="3000" />
<!-- 是否开启自动驼峰命名规则(camel case)映射 -->
<setting name="mapUnderscoreToCamelCase" value="true" />
<!-- 代理 -->
<!-- 指定 Mybatis 创建具有延迟加载能力的对象所用到的代理工具 -->
<setting name="proxyFactory" value="CGLIB" />
<!-- 延迟加载 -->
<setting name="lazyLoadingEnabled" value="true" />
</settings>
</configuration> - spring-context.xml中配置mybatis
1
2
3
4
5
6
7
8
9
10
11
12
13
14
15
16
<!-- 配置mybatis, 绑定c3p0 -->
<bean id="sqlSessionFactory" class="org.mybatis.spring.SqlSessionFactoryBean">
<property name="dataSource" ref="dataSource"></property>
<property name="configLocation" value="classpath:mybatis-config.xml"></property>
<property name="mapperLocations" >
<list>
<value>classpath:mapper/*.xml</value>
</list>
</property>
</bean>
<!-- 扫描生成所有dao层 -->
<bean class="org.mybatis.spring.mapper.MapperScannerConfigurer">
<property name="basePackage" value="com.ryx.demo.dao"></property>
<property name="sqlSessionFactoryBeanName" value="sqlSessionFactory"></property>
</bean>
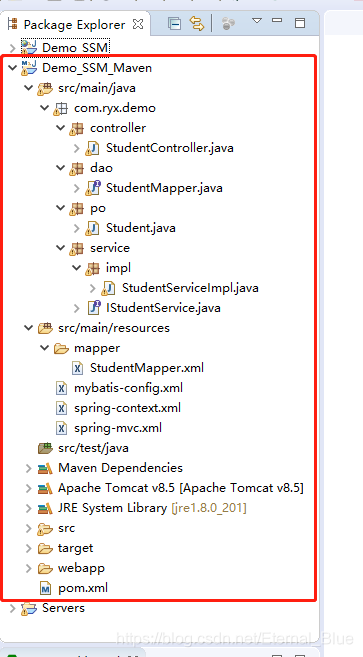
编写Java业务逻辑
创建entity、controller、servcie . . . .class
项目结构如下
我这里用到了阿里的fastjson,用的时候需要在pom.xml中引入依赖1
2
3
4
5
6<!-- fastjson -->
<dependency>
<groupId>com.alibaba</groupId>
<artifactId>fastjson</artifactId>
<version>1.2.83</version>
</dependency>
Po实体类层
1 | public class Student { |
Controller控制层
1 | import java.text.SimpleDateFormat; |
Service层
1 | public interface IStudentService { |
ServiceImpl业务逻辑层
1 | import java.util.List; |
dao层
1 | import java.util.List; |
mapper层
1 |
|
数据库
1 | /* |
 微信
微信 支付宝
支付宝