前言
随着nginx的使用,一台服务器下的域名及端口多了以后,在nginx.conf配置文件中就需要不断的配置server。
久而久之,就会发现nginx.conf特别臃肿。
所以我在这里对这个nginx.conf进行解耦拆分,让服务器上每个项目都有自己独立的子配置文件。
接下来的内容,可能会涉及到
主配置文件:nginx.config
子配置文件:nginx_xxx.config
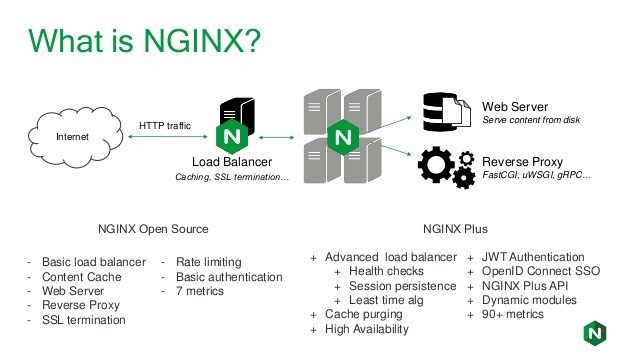
配置nginx.
配置主配置文件 nginx.config
直接把新安装的Nginx里的原始nginx.config用下面代码替换掉。
如果原始nginx.config中已经配置过server{ },就需要提前备份好,改成子配置文件使用。
1
2
3
4
5
6
7
8
9
10
11
12
13
14
15
16
17
18
19
20
21
22
23
24
25
26
27
28
29
30
31
32
33
34
35
36
37
| worker_processes 2;
pid logs/nginx.pid;
events{
worker_connections 1024;
}
http{
gzip on;
gzip_min_length 4K;
gzip_buffers 4 8K;
gzip_comp_level 2;
gzip_vary on;
gzip_types application/javascript text/css text/plain application/xml font/truetype;
sendfile on;
server_tokens off;
client_max_body_size 20M;
include mime.types;
default_type application/octet-stream;
include ./config/*.config;
}
|
配置子配置文件 nginx_xxx.config
除主配置文件nginx.config以外,子配置下的其他配置文件nginx_xxx.config,
一台服务器上有多个项目需要Nginx时,可以根据配置独立的.config文件
- 为了方便,新建一个
config文件夹
- 在
config文件夹中创建一个子配置文件,例如:ngixn_blog.config。
PS:名字自定义就行,为了好区分每个子配置文件所对应的域名及端口,尽量名字规则点,我这里采用ngixn_blogx.config。
PS:nginx.config中有检测/config/*.config的文件,所以要在/usr/local/nginx/config下创建扩展名为.config的子配置文件。
- Nginx默认的
80端口,我们直接配置IP路径就可以了。127.0.0.1。
PS:如果有特殊需求,这里可以把ip修改成自己的域名,例如:blog.renyuxin.cn。
- 如果Nginx主端口80被其他项目直接访问占用了,则需要使用别的端口,那就得需要用到ngixn代理转发
proxy_pass。
PS:我这里转发到8001端口:proxy_pass http://127.0.0.1:8001;。
- 测试:在浏览器中输入
blog.renyuxin.cn,默认找到ngixn_blog.config下的index.html。即:http://blog.renyuxin.cn/index.html。
- 可以多配置多个
ngixn_blog.config子配置文件,每个文件关联一个server,或者也可以在一个ngixn_blog.config子配置文件中配置多个server{ }。
1
2
3
4
5
6
7
8
| server{
listen 80;
server_name 127.0.0.1;
location ~^/ {
root html;
index index.html index.htm;
}
}
|
或者 有域名需求的话,可以用这个进行代理转发
PS:浏览器访问blog.renyuxin.cn时,自动转到http://127.0.0.1:8001这个路径
1
2
3
4
5
6
7
| server{
listen 80;
server_name blog.renyuxin.cn;
location ~^/ {
proxy_pass http://127.0.0.1:8001;
}
}
|
Nginx参数
1
2
3
4
5
6
7
8
9
10
11
12
13
14
15
16
17
18
19
20
21
22
23
24
25
26
27
28
29
30
31
32
33
34
35
36
37
38
39
40
41
42
43
44
45
46
47
48
49
50
51
52
53
54
55
56
57
58
59
60
61
62
63
64
65
66
67
68
69
70
71
72
73
74
75
76
77
78
79
80
81
82
83
84
85
86
87
88
89
90
91
92
93
94
95
96
97
98
99
100
101
102
103
104
105
106
107
108
109
110
111
112
113
114
115
116
117
118
119
120
|
user nobody nobody;
worker_processes 1;
worker_rlimit_nofile 65535
pid logs/nginx.pid;
events {
use epoll;
worker_connections 1024;
}
http {
include mime.types;
default_type application/octet-stream;
log_format main '$remote_addr - $remote_user [$time_local] "$request" '
'$status $body_bytes_sent "$http_referer" '
'"$http_user_agent" "$http_x_forwarded_for"';
access_log logs/access.log main;
client_max_body_size 20M;
client_header_buffer_size 32k;
client_body_temp_path /dev/shm/client_body_temp;
large client_header_buffers 4 32k;
sendfile on;
tcp_nopush on;
tcp_nodelay on;
keepalive_timeout 65;
client_header_timeout 10;
client_body_timeout 10;
gzip on;
gzip_min_length 1k;
gzip_buffers 4 16k;
gzip_http_version 1.1;
gzip_comp_level 2;
gzip_types text/plain application/x-javascript text/css application/xml;
gzip_vary on;
server {
keepalive_requests 120;
listen 88;
server_name 111.222.333.123;
charset utf-8;
access_log /www/wwwlogs/111.222.333.123.log main;
error_log /www/wwwlogs/111.222.333.123.log main;
include enable-php-74.conf;
include /www/server/panel/vhost/rewrite/111.222.333.123.conf;
location ~*^.+$ {
root html;
index index.html index.htm;
deny 127.0.0.1;
allow 172.18.5.54;
}
location ~ ^/(\.user.ini|\.htaccess|\.git|\.svn|\.project|LICENSE|README.md){
return 404;
}
location ~ \.well-known{
allow all;
}
location ~ .*\.(gif|jpg|jpeg|png|bmp|swf)$ {
expires 30d;
error_log /dev/null;
access_log off;
}
location ~ .*\.(js|css)?$ {
expires 12h;
error_log /dev/null;
access_log off;
}
error_page 404 /404.html;
error_page 500 502 503 504 /50x.html;
location = /50x.html {
root html;
}
}
}
|
Nginx启动和关闭
虽然Nginx可以直接实时监听,但是每次修改完配置文件,都需要重启Nginx,新的配置才能生效
启动Nginx
1
| /usr/local/nginx/sbin/nginx
|
关闭Nginx
常见的异常报错
问题1:nginx.conf文件中有多余的空格
nginx: [emerg] invalid number of arguments in “pid” directive in /usr/local/nginx/conf/nginx.conf:7
nginx: [emerg] invalid number of arguments in “ “ directive in /usr/local/nginx/conf/nginx.conf:7
解决方式:
问题2. nginx.conf文件的编码格式问题
nginx: [emerg] unknown directive “ server” in /usr/local/nginx/conf/./config/smart_nginx_main.config:1
解决方式:
如果再三确认配置没有问题的话,那就是编码的问题了。
我习惯用记事本编辑,但是nginx.conf文件一旦被记事本编辑保存过,就会变成含BOM头的文件,所以会报错。
记事本编辑UTF-8都会加BOM头,如果其他xxx.conf也出现这个问题,先去看看编码格式对不对。
使用其他编辑器将文件另存为 UTF-8 无BOM头 的格式编码。
我这里用的是Notepad++文本编辑器,所以直接在本地修改编码格式,方便。
``` Nginx
 微信
微信 支付宝
支付宝